
The Definitive Guide to building a PLG Tech Stack
This guest post is by Madhukar Kumar, CMO SingleStore and ex-DevRev.
I have worked in enough marketing organizations to see that most of the time, the marketing tech stack is usually a smorgasbord of technology and solutions that are usually purchased by random acts of reactive and opportunistic buying over a period of time. Due to this, the longer a company has been around, the worse the quality of data that the teams have to work with. This leads to countless problems like marketing to the wrong target audience (for example, someone who just purchased your product) and, worse, not reacting quickly to the intent signals from all the inbound inquiries.
More recently, I built an entire Product-led Growth (PLG) marketing tech stack from scratch, which opened my eyes to some best practices. I intend to cover the steps of building the tech stack and best practices here so that other startup growth marketers can replicate this for their needs.
Any effective Product-led growth tech stack can be broken into three broad categories that work in tandem to ensure data is flowing correctly and is available in real-time for your team to act on quickly. These categories include:
- The presentation layer typically consists of your company website and blog and has primarily static content. In B2B companies, this also consists of landing pages with forms to capture leads or Marketing Qualified Leads (MQL)s.
- The data layer is the stack’s most crucial part. The data layer for a marketing team falls under two buckets — A database of companies and contacts you want to market to and a database of users who have either signed up for your product (free and paid) or have filled out some form to download an asset or sign up for a webinar or event.
- The orchestration layer — The layer that cuts across both the presentation and the data layer is typically some orchestration engine that can send your audience emails, SMS, and in-app notifications. In addition, this layer also includes some sort of an integration workflow engine that connects different data sources and orchestrates actions across various tools (for example, update the CRM, notify the team on Slack, and send an email every time someone signs up for a free trial).
There is a fourth category, the glue between the website and the app, the authentication layer. However, this category has been commoditized to the extent that it has become reasonably trivial to add to the presentation layer, so I am choosing to cover that in the presentation layer instead of calling it out separately.
The Presentation Layer
When it comes to the presentation layer, it is essential to understand that you will always need two kinds of people to work on your website —
- The authors and content writers who will have and typically want nothing to do with code and
- Front-end software developers who would constantly be working with designs delivered by the design team to build web pages. This second category of folks need to have HTML, JS, and CSS as their core skillset.
The trick is to have a tech stack that separates the code from the content so that both the content editing and the code editing work streams can run in parallel. In addition, you want the tech stack to be set up in a way so that you can make changes and deployments to your website as and when you want or deploy on commit.
For several years, the most common technology in this area for startups had always been Wordpress due to the ease of installing and quickly publishing blogs and pages in a fairly low code way. However, after using this tech stack in a couple of companies, the cons with Wordpress far outweigh the pros as the website and presentation layer for PLG as the team grows over a period of time. So, instead of going into the details of why not to use Wordpress, let me talk about two React frameworks that are far more powerful and flexible and provide all the tools marketing and development teams need to be truly agile.
These two frameworks are — Gatsby (recently acquired by Netlify) and NextJS(backed by Vercel).
I have used both Gatsby and NextJS, and here is how you choose one vs. the other. If you have a lot of static content and want a lightning-fast website with very little content behind a login, go with Gatsby. On the other hand, if you want a stack that does both static site generation and has features like content, videos, etc., that sit behind user authentication to provide personalized screens (for example, your own community app), then go with NextJS.
Here is a simplistic architecture diagram that separates code from content and enables deploy-on-commit (with review).

The Data Layer
Now let’s look at the data layer, which can be subcategorized into measurement and reporting.
I) Measurement — Before you do anything else on your website, do yourself a favor and set up Google Tag Manager (GTM). In case you are not familiar with GTM, think of it as one tag or Javascript that you can add to your website, and once it has been added, you can add other includes from other solutions and trackers like Fullstory, Appcues, etc. If you are not using GTM or another similar universal tag manager, over a period of time, things tend to get out of hand as multiple tags are added, and each time you do this, you have to make a code change. With GTM, you can go in as an Admin and add and remove tags as needed without any code changes, and the effect takes immediately. You can learn more about GTM here.
Let’s look at some examples of tags you may want to add to track the right metrics for PLG and add additional functionalities.
- Segment — Segment, which is now part of Twilio, allows you to track events from your website and app and deposit the data as JSON to a destination of your choice. Segment has a wide variety of source and destination connectors that allow you to act upon the data and either nudge your users (more of this in a bit) or personalize the user experience as they sign up and move along the PLG journey crafted for your website and application. At a very high level, Segment collects two kinds of event data through two different methods — 1) Track event — This is typically an event out of the box like Click, etc., or something that you can define for your use case, for example — CustomerClickedBlueButton and 2) Identify event — This is an event that also includes a user id. This is typically used only after the user has signed up and consented to be tracked. This gives granular details about what the customer did after they logged in. I must caution that Segment is not cheap and becomes expensive as you continue to add more destinations over time. An open-source version of Segment is RudderStack, which I have personally not tried yet but can be a good option for startups looking to start for free.
- Datadog — From purely a marketing perspective, I find it helpful to look at anonymized Chapter Resourcessession replays to understand what users are doing on the website prior to signing up and what features and, in general, troubleshoot issues that are “silent failures.” For example, you may have a bug in the sign-up page that may be preventing some users from signing up that you don’t know about, but you can only discover when you watch a random set of session user clicks. Datadog’s Real User Monitoring (RUM) allows you to do that fairly easily. An alternative to Datadog is FullStory but keep in mind they don’t have a free trial, and it is not cheap to get started.
- Ad platforms — Twitter, Facebook, LinkedIn, and Google, have separate tags that allow you to track conversions of ads on your website. However, in my experience, ads with Calls to Action (CTA) for sign-ups perform poorly, so I would advise against using these. What is useful, though, is when the CTAs are around top-of-the-funnel assets, and then using these tags, you can re-target users on your website who have shown some intent of research or trial. You can connect your ad platforms to your website in two ways, either directly as GTM tags or as destinations from Segment. I suggest adding these directly into GTM for the re-targeting use case mentioned above.
- Clearbit — This is technically not a measurement tool but rather a way to make users fill out fewer details for better conversion, but I would instead add this handy tool here vs. creating a new category. With Clearbit, you can make an API call when a user provides you with an email address and get back matched data so that you don’t have to ask for other details like Title, location, etc. This provides a better user experience and leads to lower abandonment during sign-ups. Clearbit doesn’t always match data. In fact, it is not at all useful when a user puts in a Gmail or other personal email address, but it is still very useful when there is a match. In addition, the pricing is based on consumption, so you pay for what you use.
- Customer Relationship Management (CRM) platform — Typically, you would need a CRM like Salesforce or Hubspot to capture all users who have signed up for trials and or have shown intent on the website by signing up for a webinar, events, hackathons, or other community activities on the website that required filling up a form. You can create a form and directly post the data to the CRM, but my advice would be to put it through Segment because, within Segment, you can create multiple lists of users based on attributes and behavior (aka Segments) and then send them to different destinations for different use cases. Some choices for a CRM for startups include Hubspot, Customer.io, Humanic, and Salesforce. You typically use Salesforce if you are in B2B and have a sales team as well (more of this in another chapter). Humanic, a relatively new tool, allows you to view segments based on user activity and give you insights that help with your PLG efforts, especially around identifying and nudging your users towards realizing value out of your product and thus helping with adoption and stickiness.
The architecture now looks something like this:

II) Measurement — Before we get into how to measure and report, let’s look at some high-level metrics that are extremely helpful to understand if your campaigns are working, the cost of the campaigns, and if your users are converting to a paid plan or not. These metrics can be classified into two sub-categories — Acquisition and Adoption.
Under Acquisition, you want to track the traffic coming to your website and sign-up pages at the highest level. Typically they fall under organic and paid channels. For paid channels, you want to track (attributed through UTMs) how much money you have spent on each campaign, cost per click, cost per Acquisition, and the number of free trials by the day (or week).
Under adoption, you want to track some key events after the user has signed up, for example, did they finish the onboarding, did they invite other users, and finally, did they convert to being a paid user?
To measure both acquisition and adoption metrics, I recommend sending all data into a real-time database like SingleStore that can handle both structured and unstructured data and can be used for orchestrating real-time actions (more of this in the next section).
A typical Segment based architecture looks like below:
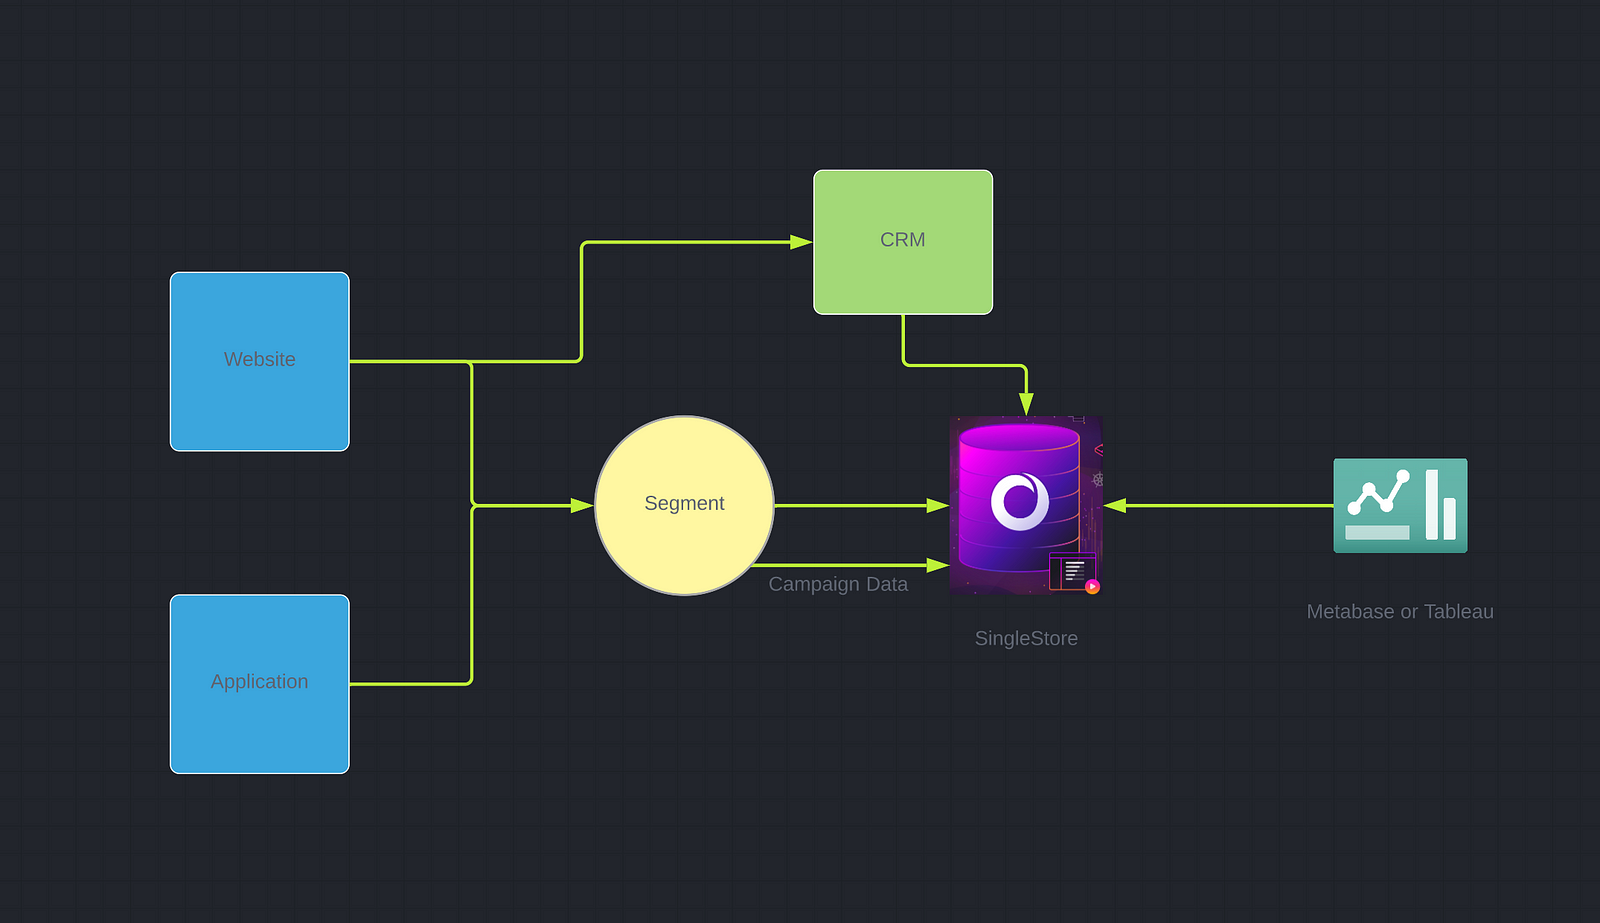
In full disclosure, I work for SingleStore, so my opinion of using SingleStore as a PLG source of truth may be biased, but you can choose Snowflake or Google BigQuery as an alternative. My only issue with both those tools is that they are not real-time, so when it comes to orchestration, you will find you are limited in how quickly you can react to your user’s actions. Also, Snowflake could get very expensive as you grow, so you may want to do your evaluations before you pick a data warehouse for your reporting needs.
I should add that this is an opinionated version of the architecture based on my experience. You can also use a tool like Heap, Pendo, Mixpanel, or Amplitude either directly or by putting that data into Segment through GTM and then using one of the product analytics tools as a Segment destination. When you do this, remember that you are adding one more tool and yet another data source that can lead to complexities.
Orchestration layer
Finally, once you have your data flowing the way you desire, you want to be now able to orchestrate actions against events being captured within your website and your app. These actions could range from either personalizing the content of a page when the user is anonymous or sending a nudge via email and in-app notification to the identified user if the user is signed in. There are a couple of tools for this, which again fall under two sub-categories — Low and no-code and code-driven orchestration tools.
Regarding low to no-code, you can choose between Zapier, make (formerly Integromat), and Workato. In the code-driven category, my personal favorite is Pipedream because it is Node based, so it helps with re-usability and has a free version you can get started with.
In addition, you can also use Segment functions to perform some actions of data (for example, transform, de-dupe, etc.) and then forward them to destinations like Sendgrid, Mailchip, Eloqua, etc. to send an email or even send out text messages through Twilio. I should also add that Segment recently also launched a new product called Twilio Engage that allows you to create workflows and run all kinds of orchestration from within Segment itself.
Conversation and onboarding tools
I did not call this category out initially because this is one of those things that fall in the presentation layer, but it can help you both with the collection of data and acting on them. I recommend looking at two options in this area 1) Intercom and 2) DevRev (full disclosure I used to work at DevRev before).
With Intercom, you can not only initiate a chat with a human when a user is on your website or your app, but you can also view some valuable analytics around the user journey and orchestrate actions based on several user attributes as well as a user action. Remember that you can also do this with Segment, so use it based on your requirement.
As a quick aside, if you are in B2B, consider adding Calendly to Intercom to facilitate meetings directly from within Intercom.
When it comes to DevRev, it is more than a chatbot in the sense it can be embedded in your website and application with a JS tag, and it enables you to also add support to your product with humans through DevRev PLuG. Your users are also able to create support tickets and view the progress of these tickets from within PLuG. In the backend, you can connect these tickets and issues directly to the GitHub product code so that you can view insightful data about your product in general.
Summary
In summary, you can create an entire PLG tech stack under three main categories — the presentation, data, and orchestration layers. The main goal is to identify what you want to track and what actions you want to perform and experiment with to drive more product acquisition and adoption. Once you figure this out, you can think of the data pipeline that works for you and create an architecture similar to the one described in this chapter using the tools mentioned. Feel free to comment here or subscribe to my substack to gain access to additional resources for each chapter.


